Below you will find details on how to make use of the various Accounts functionality within Retail 365.
Accounts Module
In the Accounts module there are two separate pages for different types of Accounts:
- Accounts: this section allows you to work with Credit Accounts
- Loyalty Accounts: this section allows you to work with Loyalty Accounts
Credit Accounts
- Set up a new Credit Account
- Login to Retail 365
-
Press the Accounts button

-
Press Add a new Account

-
Add the account details:

-
Number: This number is created automatically
- Name: The name of the account
- Address: The address of the account
- Notes: Notes about the account
-
Type:
- Individual - One customer attached to this account
- Group - More than one customer attached to this account

- Group: If the Type is Group, choose the name of this group (You can edit or add a group by pressing the Plus button or Edit button)

- Credit Limit: Limit of credit for this account
- Edit a Credit Account
- Login to Retail 365
- Press the Accounts button
-
Press the Edit Button to edit the Account Details

- Delete a Credit Account
- Login to Retail 365
- Press the Accounts button
-
Press the Trash Can Button to delete an account

PLEASE NOTE: Accounts need to have a 0.00 balance prior to deletion.
- Print an Account Statement
- Login to Retail 365
- Press the Accounts button
-
Tick the account you would like to view and press the Statement button

-
Select the date you would like to run the statement for
- Notes can be added to the statement if needed
- If window envelopes are being used there is an option to tick Use Envelope Settings, the dimensions of your envelope window can be entered here
-
Press Generate to preview the statement

-
Press the Print button to print the statement
-
Press Back to Accounts to return to the main accounts screen

- View Account Transactions
- Login to Retail 365
- Press the Accounts button
-
Tick the account you would like to view and press the Transaction List button, enter the date, notes & envelope settings as required in the same way you do so for the account statements above

- Add an Account Transaction
- Login to Retail 365
- Press the Accounts button
-
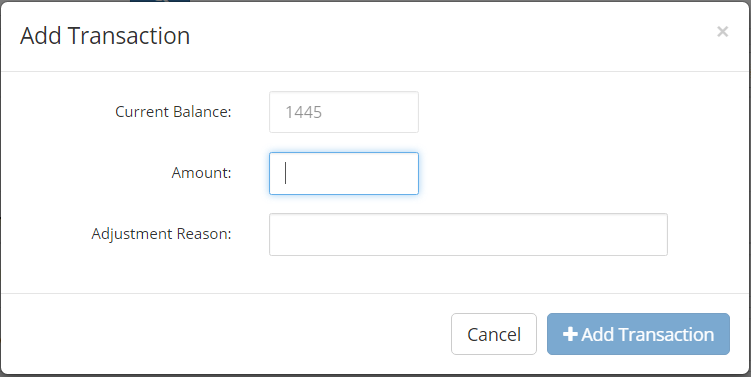
Tick the account you would like to add a transaction to and press the Add Transaction button

If you wish to add a transaction straight to the account which has not gone through the till you can do so with this function + Add the amount you would like to adjust the account by to the Amount field & an adjustment reason. + The new balance will be displayed in blue + Then press the Add Transaction button
- Adjust an Account Balance
- Login to Retail 365
- Press the Accounts button
-
Tick the account you would like to adjust and press the Adjust Balance button

-
If you wish to adjust the balance on an account you can do so with this function
- Input the desired new balance into the New Balance field and the Adjustment Reason
- The amount the account will be adjusted by will be displayed in blue
-
Then press the Adjust Balance button

- Merge two Accounts together
- Login to Retail 365
- Press the Accounts button
- Tick the account ypu would like to merge into another.
-
Press the Merge button

-
The box below will display, then choose the account you would like to merge the account into and press Move Items.

-
The account information will now be merged for these selected accounts
Loyalty Accounts
Loyalty Accounts allow you to reward your customers for their repeat custom in the form of Loyalty Points. You can then allow customers to redeem these points against future sales or provide different offers to them based on their loyalty to your store/group.
- Create a Loyalty Account
LOREM IPSUM
- Edit a Loyalty Account
LOREM IPSUM
- Delete a Loyalty Account
LOREM IPSUM
- Target Loyalty Accounts for Marketing
LOREM IPSUM
How to handle "Deposit" accounts
If your store facilitates "Deposit" accounts where customers can pay in money in advance e.g. Christmas Clubs, then you can use the Accounts functionality in Retail 365 to do this.
In order to treat an account like a "Deposit" account, we recommend to set the Credit Limit on the account to be 0.00. This will ensure that the customer will only be able to purchase goods in the store using money they have already paid in to the account.
Once the Credit Limit is set to 0.00 you can then process any payments into the account either at the Till, e.g. Cash, Cheque or Credit Card payments or in the Accounts module by using the Adjustment or Add Transaction function e.g. Electronic Funds Transfer (EFT). So long as there is a balance on the account, the customer will be able to redeem this balance against products purchased at the Till.
NOTE: if you leave the Credit Limit field blank then you will not be able to sell any items to the Account at the Till so you must enter 0.00.