Dispensing
- Insert a New Dispense
- Search and select the Patient to dispense to
- Press the New Script key (ALT & I) or click on the New Script button

- Type the name of the item you wish to dispense
- The search defaults to items dispensed recently. If you wish to search all products press F8

- Enter the DISPENSED quantity
- Enter the dosage instructions (Alt & I will allow you to type instructions)

- Press NEXT to add another item
- Press F12 or click Complete to complete the dispenses
Enter Dispensed, Prescribed and Owed Quantities
- DRUG - Typing into this field will start your search for the product you are dispensing such as recent, activem, etc.
- DISPENSED - Enter here the Quantity of the drug that will be dispensed. When a product is selected the total quantity of a drug in a pack will be added. E.G. 1 pack has 28 tabs, the quantity will be 28.
- PRESCRIBED - Enter here the Quantity of the drug that has been prescribed to the patient. Like with the DISPENSED field, when a product is selected the total quantity of a drug in a pack will be added.
- OWED - This will display the Quantity of the drug that is owed to the patient, namely the difference between the DISPENSED Quantity and the PRESCRIBED Quantity.
Enter Repeats
- MAXIMUM - The Number of repeats that will be made for the drug.( if you are wanting to do a total of 4 phases, you should enter 3 here. 3 + the dispense you are currently doing )
- MADE - The number of repeats that have been made for the drug.
- LEFT - The Number of repeats left for the drug, namely the difference between the MAXIMUM amount and the MADE amount.
Enter Drug Directions / Instructions / Codes
-
DOSAGE - Enter here the Dosage Code for directions already entered in the system, e.g. MD will generate the directions "AS DIRECTED"
- Double-clicking into the DOSAGE field will bring up the list of dosage codes and their instructions which you can select from.

Using this window you can enter a new dosage code and the directions attached to it by clicking the insert button

- Enter in the Shortcode you wish to assign to the dosage and the Description attached to it and click OK
Dispense multiple Schemes
- To dispense dual schemes
- Start by highlighting the items you want to repeat, then press repeat.

- On the Dispensing screen you will see the scheme collumn highlighted in pink, this is to draw your attention to the schemes the items have been dispensed under.
- When satisfied with your dispensing, click on complete.
- Edit a Previous Dispense
- Search and select the patient you wish to dispense to
- Select the script you want to edit
- Press the Edit button

- Make the necessary changes
- Press F12 or click Complete to complete the dispense
Change the Doctor on a Dispense
- After editing a dispense or inserting a new dispense, go to the Add Info tab
- You can change the GMS Doctor by searching in the GMS Doctor box by name or by GMS number of the doctor.
- You can change the Presciber by searching in the Presciber box by name or by GMS number of the doctor.
- If it is a new doctor enter in the doctor's name ( Surname, First Name ) and press enter and a quick add doctor window will appear.
- To change the GMS Doctor all items on the script press Select All

- Press GMS Doctor, select the doctor and press Ok.
- Press F12 or click Complete to complete the dispense
Change the dispense date of an Item
- After editing a dispense or inserting a new dispense, press Select All

- Press Dispense Date
- Enter the dispense date and press Ok
- Press F12 or click Complete to complete the dispense
Change the dispensed scheme for all items of a script
-
On the dispense screen, select the 'Select All' option and then select Scheme

Note - If you only want to do this for the item you currently have selected then click the down arrow next to the Select All box and then select Scheme.
- The following Window will appear :

It shows the following details:
- Patient - The patient's name
- Current Drug - The drug you have selected to adjust the scheme for.
Note - If you choose the Select all option, though it states one drugs name, the scheme selected will be for all drugs.
- Current Scheme - The Scheme the item(s) is currently on.
- New Scheme - The Scheme the item(s) will be changed
- Once you have added in the details needed, select ok and the schemes will be adjusted accordingly.
- Deleting items or a full Script
Delete an item
- Start by highlighting the item you want to delete.
- Then click on delete located at the bottom of the dispensing screen.
- You will then be asked are you sure you want to delete this item.
- Click on yes.

Delete a Full Prescription
- At the bottom of the dispensing screen you will see Delete.
- To the Right of the bin icon you will see a drop-down arrow.
- Click on the arrow.
- Delete Script will then appear.

- Click on Delete Script.
- Touchstore will then ask you, are you sure you want to DELETE ALL the information you have entered ?

- Select Yes.
- Add Notes to a Drug
- Highlight the drug, on the bottom right hand corner you will see “Enter Drug Note Here”.

- Type in what you would like to say, you will then see that a Green tick appears in the note column, this is to highlight that there is a note against this particular drug.

- Select the Scheme / Script Type
- SCHEME - Select the scheme that the drug will be dispensed on
- EMER SUPPLY/LOAN - Underneath the scheme dropdown will be either EMER SUPPLY/LOAN, depending on the settings of the scheme you are dispensing on.
- PHASED - Tick box for starting the processing of phasing the dispense.
- NOT DISPENSED - Tick box to mark the item as not dispensed.
- NOT GIVEN - Tick box to mark the item as not given.
- Product Search Filter while Dispensing
Above the DRUG search field, there are four options that allow you to adjust the filtering parameters that are used when searching for a drug.
You can cycle through these by pressing F8 on your keyboard.

- RECENT - This will show all the products recently dispensed.
- ACTIVE PRODUCTS - This will show all Products that are marked as active
- GENERIC SEARCH - This will search by the Generic name of the item, e.g. Searching Paracetamol will bring up all products containing Paracetamol.
- BRAND/GENERIC - This will filter the search to both the Brand Name and the Generic Name of all products.
- View/Edit a Drug Note from the PMR Console
- Enter your PIN number
- Select the patient for whom you wish to make the note
- The PMR Console will open
- Drug notes are indicated with a green tick under the Notes column
- Use the up and down arrow keys to select the item with a note you wish to view
- As you arrive on the item, the drug note is automatically displayed in the Drug Notes text box at the bottom right of the PMR Console
- Click Alt & D, the Notes screen will open for the selected Drug Note visible at the bottom of the PMR Console
- You can now edit the note as required
- Click Alt & C to save and close when complete
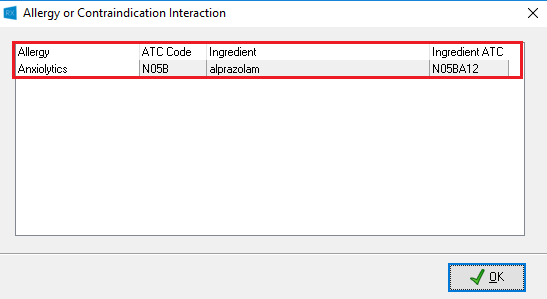
- Allergy or Contraindication Interaction
If an ALLERGY OR CONTRAINDICATED CONDITION is added to a patient's information on the PATIENT MAINTENANCE (F3) screen under the MEDICAL tab the below screen will appear if an item is dispensed which has the same ATC (Anatomical Therapeutic Chemical) CODE.
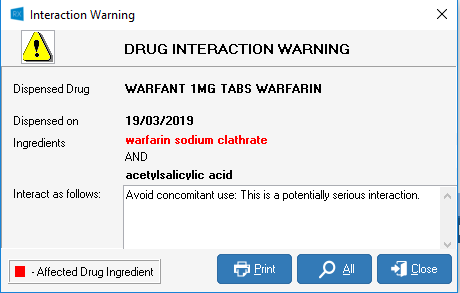
- Interaction Warnings
When an item is dispensed the system looks at the other scripts dispensed within the INTERACTION PERIOD and if the item being dispensed has an INTERACTION with any item within the INTERACTION PERIOD if will display the below screen.
- In this example, Warfant was dispensed and I then tried to dispense Nuprin.
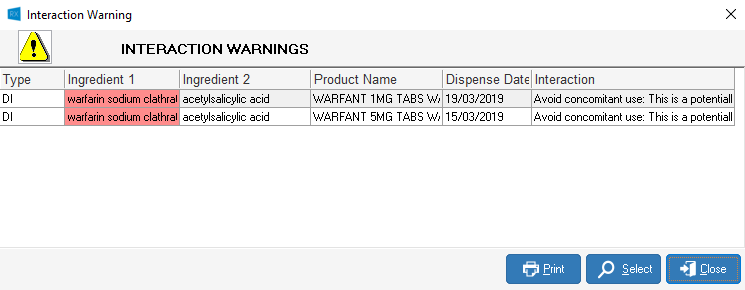
- If you wish to print the INTERACTION WARNING then either click the Print button or use the KEYBOARD SHORTCUT P.
- To see the INTERACTION WARNING in more detail either click the Select button or use the KEYBOARD SHORTCUT S.
- To return to the first screen press the All button or KEYBOARD SHORTCUT A.
- To Close the INTERACTION WARNING screen press the Close button or KEYBOARD SHORTCUT C.
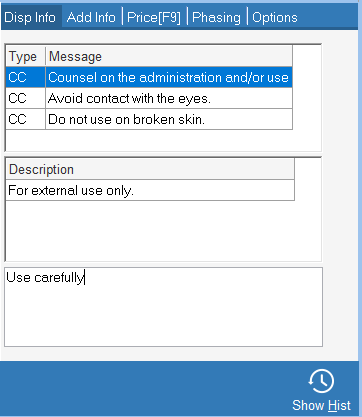
- View Counselling Codes, Warnings & Notes in the Dispense Info Tab
- In the DISPENSE INFO TAB, there are three fields each containing information for the drug dispensed.
- The First fields containing the COUNSELLING CODES for the drug, the second field containing the DRUG WARNINGS and the third contains NOTES on this individual dispense of the drug.
- Notes can be entered in this third field and can then be seen in the patients PMR when the drug is selected.
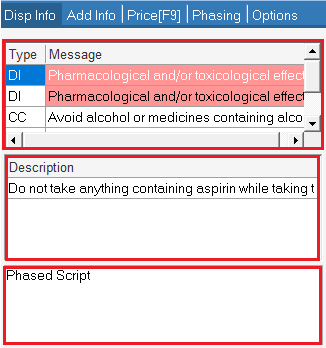
NOTE - COUNSELLING CODES and WARNINGS are maintained by the IPU.
- If you notice either of these are incorrect please check that you are running your monthly IPU changes file.
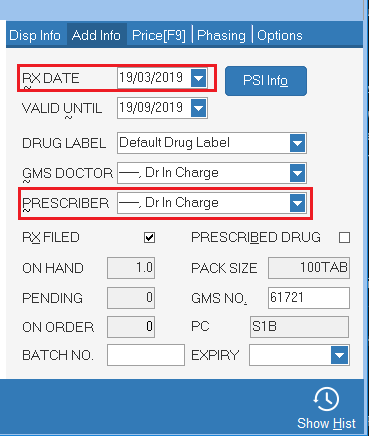
- View Rx Date, Drug Validity, PSI Info in the Additional Information Tab
- RX DATE - Allows you to set the date on the script. This can be changed by clicking the DROP DOWN ARROW or using the KEYBOARD SHORTCUT CTRL, ALT and R
- VALID UNTIL - Defaults to six months from the RX DATE. This can be changed by clicking the DROP DOWN ARROW or using the KEYBOARD SHORTCUT CTRL, ALT and U

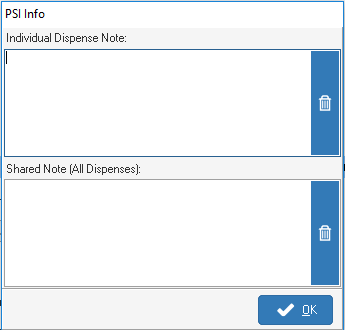
- PSI INFO - Used to store additional information on a dispense which you may need in the case of an inspection. This can be changed by clicking the PSI INFO button or using the KEYBOARD SHORTCUT ALT and O. A screen will appear which allows you to enter the information.
- DRUG LABEL - Drug Label Template, can be changed by clicking the DROP DOWN ARROW. (if you double-click the drop down box, it will allow you do add a new layout )
- GMS DOCTOR - Patients GMS DOCTOR, can be changed by clicking the DROP DOWN ARROW or using the KEYBOARD SHORTCUT CTRL, ALT and G.
- PRESCRIBER - Patients PRESCRIBER, can be changed by clicking the DROP DOWN ARROW or using the KEYBOARD SHORTCUT CTRL, ALT and P.
- PRESCRIBED DRUG - Allows you to enter the PRESCRIBED DRUG if it differs to the one dispensed. The tick box can be ticked or KEYBOARD SHORTCUT ALT and B, this will bring up a screen so that the prescribed drug can be entered.
- ON HAND - This is the QUANTITY of the item which you have on hand.
NOTE Orders must be validated for ON HAND to be reflected correctly.
- PACK SIZE - Size of the pack being dispensed
- PENDING - ITEM is on an order pending list for a supplier.
- ON ORDER - Item is ON ORDER with a supplier and the order has not been validated yet.
- PC - This is the POISON CODE for the item.
- GMS NO - GMS NUMBER of the item, this can be changed by DOUBLE-CLICKING the field containing the GMS NUMBER. The KEYBOARD SHORT KEY ALT and . can also be used.
- BATCH NO - BATCH NUMBER of the item, can be entered by clicking on the BATCH NO field.
- EXPIRY - EXPIRY DATE of the item, can be entered by clicking on the EXPIRY field.
- View Directions on a Drug Label.
- Highlight the item you want to view the directions on.
- At the bottom of the PMR on the bottom left you will see an icon that says view.
- Click in this and you will be able to view the directions on the drug label.


Repeat Prescriptions
- Repeat a Previous Dispense
- Search and select the patient you wish to dispense to
You have two options from here.
-
OPTION 1
- You can tab off individual items and click on repeat.
- To choose this option ensure you are in the show SHOW ITEMS mode located on the top left of the patients PMR.

-
OPTION 2
- You can repeat a FULL prescription by just clicking once on a Previous dispense. To choose this option ensure you are in the SHOW RX mode.
- This will then divide the items into their individual dispenses.
- Click on the dispense and press repeat

-
Click on complete to finish your dispense.
- Insert a Repeat Script
- Search and select the Patient to dispense to
- Press the New Script key (ALT & I) or click on the New Script button
- Select the drug to be dispensed
- Enter the 'Dispensed' and 'Prescribed' qty
- Enter the Directions

- Enter in the Maximum repeats ( the number of repeats that will be made for the drug )
- Enter in the Made repeats ( The number of repeats that have been made for the drug already )
- The Left repeats will automatically populate ( the number of repeats left for the drug, the difference between the maximum number of repeats and the made number of repeats.
- Dispense the next Repeat
- Search and select the Patient to dispense to
- Select the script you want to dispense the next 'repeat' of.
- Select 'repeat' located at the botto of the screen
- To finish repeating the script click complete or press (KEYBOARD: ALT + M)

- All Repeats Used
When the maxium number of repeats has been reached the system will issue a warning that the maxium numbner of repeats has been made.

- Selecting Yes will start a new script for the current drug
- Selecting No will add an additional repeat to the exosting script
Note Adding an extra repeat will cause a claim error when verifying the script.
- Selelting Cancel will cancle the repeat request
- Selecting Yes to All will repeat ALL drugs on the current script.
- Adjust the repeats for all items of a script
- On the dispense screen, select the 'Select All' option and then select Adjust Repeats

Note - If you only want to do this for the item you currently have selected then click the down arrow next to the Select All box and then select Adjust Repeats.
- The following Window will appear:

- It shows the Following details: Patient - The patient's name Current Drug - The drug you have selected to adjust the repeats for. Note - If you choose the Select all option, though it states one drugs name, the repeats added will be for all drugs. Repeats Made - Number of Repeats completed Max Repeats - Number of Repeats to be done.
- Once you have added in the details needed, select OK and the repeats will be adjusted accordingly.
Phased Items
- Insert a Phased Item
- Select the drug to be dispensed
- Enter the 'Dispensed' and 'Prescribed' qty
- Enter the Directions
- Tick the PHASED box
Once ticked, the Phased Dispense window will appear:
- Additional Phases - the additional number of phases to be dispensed after today's dispense
- Auto Split Phases defaults to 4 weeks ( Other options: 4 Weeks Bi Weekly, Daily, Other )
- Reason - the reason for phasing the item, e.g. Patient Cannot Manage
- Start Date - select the day that the phasing of the item will start
- Dispense All Phases Now - allows you to dispense all the phases for the patient now

- Click Ok
- The Phased Grid will appear as such:

- Press F12 or click Complete to complete the dispense
- Dispense the Next Phase
To dispense the next phase of a script start by selecting the script.
- Select repeat to open the script to edit the phase
- Select complete to issue the next phase

- Repeat a Phased Script
To repeat a completed phased script start by selecting the script
- Highlight the script and select repeat
- The phasing dispensing dates can be manually changed by selecting the phase date and entering in the new phased date(s)

- Alternatively to auto adjust ALL phases select delete all located underneath the phases.
- Select 'Yes' to the message 'Are you sure you wish to delete all phases'

- Tick the phased box
- Enter in the phased information and click 'Ok' or press (KEYBOARD: ALT + O)
- the new phased dates will show in the Phasing tab
- To cpomplete the script click complete or press (KEYBOARD: ALT + M)
NB: Scripts on loan can alo be phased until a script is recieved
Owed Items
- Dispense an item with Owings
- On the Dispensing Screen, once you have the item selected that you will be dispensing enter the actual quantity to be dispensed
- Then enter in the qty of the drug that is Prescribed to the patient
- If the Qty Dispensed is less than the Prescribed Qty then Touchstore Rx will automatically calculate the owed quantity

- When there is an amount in the OWED Field there will also appear two tick boxes to the right-hand side of the OWED field
- The € tick box is ticked when you want to charge the customer for the owings now
- The Order tick box is ticked when you want to place the owings on order
- Once you are finished you can select the complete button to complete the dispense Note how the owed item is indicated in the patient's history. The owed Qty for the drug is Marked in Green

- Dispense all or part of an Owed Item
- To dispense an owing, select the item that has the owings on it

- Then select the repeat option and the owings window will appear

- Select the Dispense Owings option which will bring you into the dispense screen.
- Select complete and the last of the owings will be dispensed
- If not all the owings are available then you can repeat the steps shown in the section 'Insert an Owing' to do a partial dispense of the owings
Dispensing items without a Prescription (On Loan)
Loan Prescriptions Insert an On Loan
- Select the drug to be dispensed
- Enter the 'Dispensed' and 'Prescribed' qty
- Enter the Directions.
- Tick the On Loan box.

- Press F12 or click Complete to complete the dispense
Reconcile an Existing Loan
- To reconcile an on loan, select the item that is on loan

- Then select the repeat option and the on loan window will appear

- Check the Prescribed Date and Claim Period and if these are correct press Complete
- Press F12 or click Complete to complete the dispense
- Insert an Emergency Item
When on the dispensing screen, after having entered the details of the drug, Dispense Amount, Dosage etc... if the item(s) is one that a script hasn't been provided for yet then the item(s) is to be marked as an Emergency item.
- To do this you must tick the 'EMER SUPPLY' option.
Note - The appearance of this option is dependent upon the settings of the scheme you are dispensing under

- When you tick the box the following window will appear:

- Using this Window you will select the reason the patient is being given an emergency supply of the drug.
- If the reason you are giving is not available in the dropdown, double-click into the dropdown and you will be able to add in a new reason in the window provided.
- If you are finished, then you can then select Complete to complete the script
- The item(s) will appear like normal on the patient's file, but for the drug(s) dispensed as an Emergency Supply, there will be a note on the drug showing the Emergency Reason.

Not Dispensed Items
- Insert a Not Dispensed
- Select the drug to be dispensed
- Enter the 'Dispensed' and 'Prescribed' qty
- Enter the Directions
- Tick the Not Dispensed box and enter in your staff pin and the reason for the not dispensed

- Press Ok
- Press F12 or click Complete to complete the dispense
- High Tech Not Dispensed
- Select the drug to be dispensed
- Enter the 'Dispensed' and 'Prescribed' qty
- Enter the Directions
- Tick the Not Dispensed box and enter in your staff pin and the reason for the not dispensed
- Press Ok
- Under the Add Info tab at the right of the screen enter in 88999 into the GMS number field

- Press F12 or click Complete to complete the dispense
- Dispense an Existing Not Dispensed item
- To dispense a not Dispensed item, select the item that is not dispensed

- Then select the repeat option and the Not Dispensed window will appear

- Press Yes to confirm that you are dispensing the not dispensed item
- Press F12 or click Complete to complete the dispense
Extemporaneous Item
- Dispense an Extemporaneous Item
- On the dispensing screen, on the bottom, the following button is available for creating an Extemp Item.

- Clicking this button will bring up the following screen:

Note: If you get a message that the Extemp fees have not been setup please contact Touchstore Support.
- In the Product section of this Window, you will see the following fields:
- Type - The type of extemp that is being created e.g. Powder.
- Pricing Sizes - The Pricing for the extemp dependent on the size of the extemp e.g. Mixture up to 100ml. *
- Extemp fee - The Extemp fee for the dispense that is dependent of what was selected for the Type and Pricing Size of the extemp.

Note: The available options for Type and Pricing Sizes will differ depending on the scheme selected for the dispense.
- Once you have selected your type and pricing size for the extemp you can now go ahead add your ingredients for the extemp.
- In the Ingredients section, there is a search bar available. As you would for searching for a product on the dispensing screen, type in the name of the ingredient you want to add.
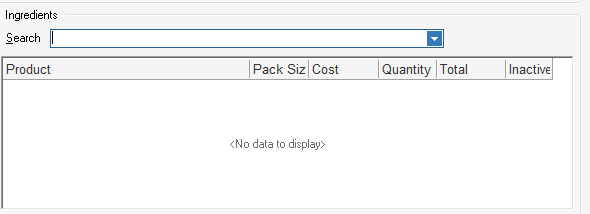
Once added, you can adjust the Qty of the Ingredient you have added by selecting the Qty Field and typing in the adjusted qty.
- Once the qty has been adjusted hit return on your keyboard and the total cost for the ingredient will adjust accordingly.
- Adjustment of the Qty can be done at any point during the creation of the extemp by simply selecting the ingredient whose qty you want to adjust.

- To add in more Ingredients to the extemp select the Insert Option and then type in the name of the ingredient you would like to add.
- If there is an Ingredient that you want to delete from the extemp item, select the item and select the delete option.
- Once you have added all your ingredients, click Ok which will close the Extemp Window.
- You will be brought back to the dispensing screen:

- The first point you will note is that the Drug Name is a concatenation of each of the ingredients names that have been added to the extemp.
Note: The Extemp fee is included in the Cost Price of the Extemp.
- Also, the GMS number for the extemp will be generated.
- The GMS Number generated is dependent on the Type and Pricing Size of the Extemp.
- A GMS number will be added automatically but please verify that the GMS number is correct for the Extemp being dispensed as the ones provided are Guideline codes and may differ dependent on changes that may occur on the HSE/PCRS side.
- Finally, the Dispense Quantity for the Extemp will be 1 by default but quantities for the Ingredients added to the Extemp are stored within it.
- Once you are finished with creating the Extemp select Complete to finish the dispense.
Unlicensed Medicines(ULMs)
- Dispense a ULM item
Unlicensed Medical Products (ULM) have no GMS Numbers.
Under most Schemes (not including DR) you need a GMS number but a ULM doesn't have one.
- If you have a GMS Number that you would usually use for this then you could enter it there and proceed to change or you could put a permanent number in for the item under the Product Maintenance module so that you would not have to re-enter it repeatedly.
- If a product has no GMS Number it is considered to be an Unlicenced or Private Item. TouchStore Rx will automatically try to change the Scheme to Drug Refund (DR) when dispensing.
Dispense pricing
- Enter a ULM Price On Pmr
- To enter a price for a ULM, dispense the medication as normal.
- When you are finished entering the dosage go to the right of the screen and click on options, then click on product.
- You will then see DISPENSE INFO, click this and you will then see an option below to enter LOCAL PRICE.

- Enter the Cost price of the UlM medication here.
- Then click close on the bottom right, this price is then saved for future dispensings.
- Change The Dispense Price of an Item.
- To Change the dispense price for a item enter the price you want to charge in the TOTAL COST box.
- You will then see in the EXTRA COST box how much you have reduced/increased the medication by.

- The price is only changed for this patient, however this is a permanent change on this patients record, so if you repeat this item you ARE repeating at the changed price.
- Price Lookup F11
- To check the price of an item or a script press F11
- Search for the item and enter the scheme and quantity

- All pricing will be displayed including cost price, markup, dispense fees and totals.
- You can add more items by pressing next or press clear to clear the item and search another product
- DPS/GMS Monthly Analysis
- To check monthly payements for a family
- Select any member of a family
- Double click on F5, provided all family members are linked, this box will then appear showing you the current payements.

- View the Costs of a Dispense
To view the costs assosiated with a dispense
- TOTAL COST - The total cost of the drug, including fees, markup etc.
- EXTRA CHARGES - You can add in extra charges into this field that you want to be added to the Total Cost of the current dispense of the drug to the patient.
- You can make this figure a positive or negative value.
- Please note that upon repeat of this dispense, this extra charge will be carried over to the next dispense until removed.
- COST PRICE - The cost of the product itself, as in the cost of purchasing the product from the supplier.
Printing
- Print a Split Label
- Start by dispensing your description as normal, press ALT I or click on new script and enter in your items you want to dispense, once you fill in your dosage.
- Note: for this option to appear, you must have the option "free type drug labels" enabled in configuration - application - dispensing.
- Click on the down arrow beside Next, you will see next and free type label will appear, click on this.

- Enter in the number of labels you want to print and click on Ok or ALT O and your labels will then be printed.

- Print an Ad Hoc Label
- To create an AD HOC label double click on F4.
- A print AD HOC label will box will then appear.

- You have the option to choose from a saved template or to create your own.
- To choose a saved template double click in the box and all your saved templates will appear.

- Highlight the template you want and press ALT S or click on Select
- it will then appear in the label content box and press
- ALT P or click on Print to print the label
- Reprint receipt, bag & drug labels in PMR
On the bottom of a patient's PMR you will see: Receipt,Bag and Label

- To reprint a receipt press ALT R or click on Receipt.
- To reprint a Bag press ALT B or click on Bag.
- To reprint a Label highlight the item press ALT L or click on Label.
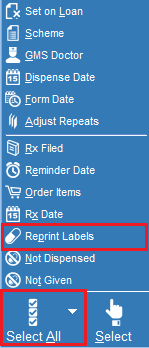
- To Reprint Labels
For an individual drug:
- If you wish to REPRINT a Label for an individual item on the script select the item and the DOWN ARROW beside the SELECT ALL and click on the REPRINT LABELS.
NOTE - Labels can be reprinted from the PMR SCREEN by clicking the LABEL BUTTON or by using the KEYBOARD SHORTCUT ALT and L.
For multiple drugs:
- To REPRINT LABELS of all items in the script, use KEYBOARD SHORTCUT ALT and A, then press P or use the MOUSE to SELECT ALL and REPRINT LABELS.
Other Dispensing Functions
- Forward the Dispense Date of Prescription
- You may have a script whose Dispense Date will not be until next month and as such you will want to move the dispense date for the script forward.
- Note - This can be done for a new script or an existing script.
- When on the dispensing screen, select the 'Select All' option and then select Dispense Date.

Note - If you only want to do this for the item you currently have selected then click the down arrow next to the Select All box and then select Dispense date.
- The 'Edit Dispense Date' Window will appear.

- In the Dispense Date field, enter the date that you want to move the Dispense Date to.

- Once you have selected the date press ok and the Window will close having updated the dispense date of the items on the script.

Note - The Original dispense date of the item appears in the drugs notes

Note - If you forward date the item into the next month then the form number generate will be for next month. E.G. The current month is March and we are forward dating a script into April, an April Form Number will be generated for the script.
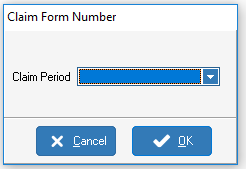
- Change the claiming period for a script
- You may have a script that either you don't want to claim for till next month or it was not sent in the Claim Bundle for the month it was dispensed.
- In this scenario you change the claim period, form number, of the script.
Note this item being dispensed in March, it will generate a form number for March when completed

- If we want to send this script, with items dispensed in March, in our April claim bundle, then we need to change the claim period of the script.
- To do this, select the 'Select All' option and then select Form Date.
Note - If you only want to do this for the item you current have selected then click the down arrow next to the Select All box and then select Form Date.
- The following window will appear:

- Using this window, select the Claim Period you want to move the script into. Then select Ok once you have selected the Claim Period.

- Back on the dispensing screen, you will see that the item has a Form Number for April.

- Select Complete and back on the PMR screen you will see the full Form Number generated for April.

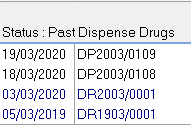
- Changing the Form Date
The FORM DATE is the month in which the script will be sent in the Claim. The FORM DATE is the first four digits of the FORM NUMBER. ie. DP2003/0109:
- 'DP' indicates the Scheme for the dispense.
- '2003' indicates the Year and Month.
- '20' means the Year is 2020
- '03' means the Month is March.
- '0109' indicates the Sequence Number e.g. this is the 109'th script for March 2020 under the DP scheme.
- To change the FORM DATE either use the KEYBOARD SHORTCUT ALT and A, then press F or use the MOUSE to SELECT ALL and FORM DATE. This will then bring up the below field. In this field, you can select the month you wish to claim for the script.
- Example - If a patient was going away on holidays. Their last dispense was the 1st of February (February FORM DATE) and they will be away for two months. The patient collects their script for the two months on the 28th of February. For the March Script, just the FORM DATE will need to be changed. For the April Script, both the FORM DATE and the DISPENSE DATE will need to be changed to April so that they can be claimed for successfully.
- Change RX DATE and PRESCRIBER
For an individual drug:
- This can be done in two ways by changing it in the ADD INFO tab on the bottom right of the dispense screen by selecting the drug which the RX DATE and PRESCRIBER needs to be changed for and selecting the DOWN ARROW beside SELECT ALL and choosing RX DATE from the menu.
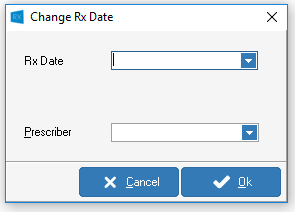
For multiple drugs:
- To change the RX DATE and PRESCRIBER use the KEYBOARD SHORTCUT ALT and A, then press X or use the MOUSE to SELECT ALL and RX DATE. This will open the CHANGE RX DATE Screen
- Select the DOWN ARROW on the RXDATE field and select the RX DATE required.
- If the PRESCRIBER differs from the GMS DOCTOR it can be changed in this screen as well by entering the Surname of the PRESCRIBER by selecting the DOWN ARROW on the PRESCRIBER Field.
- The PRESCRIBER field can also be accessed by using the KEYBOARD SHORTCUT ALT and P when on the CHANGE RX DATE Screen.

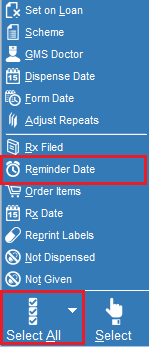
- Changing/Setting up a Reminder Date
If the MY DAY application is used REMINDERS can be set on Scripts.
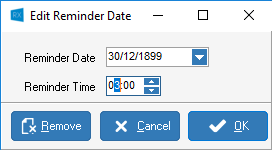
- To set a REMINDER on a Script use the KEYBOARD SHORTCUT ALT and A, then press E or use the MOUSE to SELECT ALL and REMINDER DATE.
- Select the Date and Time you would like to reminder for and click OK.
- This screen also allows you to remove a reminder.
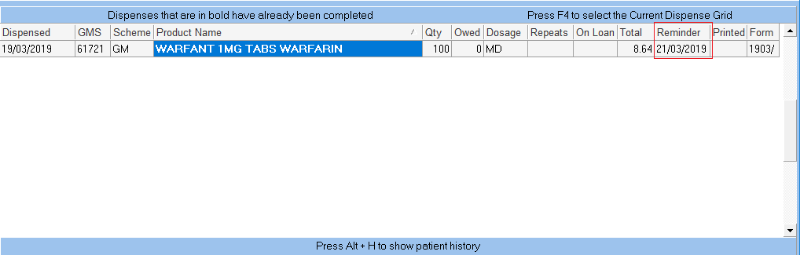
Once a REMINDER is set on a Script is will be seen on the dispensing screen.
Order Items being Dispensed
To open the ORDER FORM to order what is being dispensed,
- Click KEYBOARD SHORTCUT ALT and A, then press O or use the MOUSE to SELECT ALL and ORDER ITEMS. This will open the below screen.
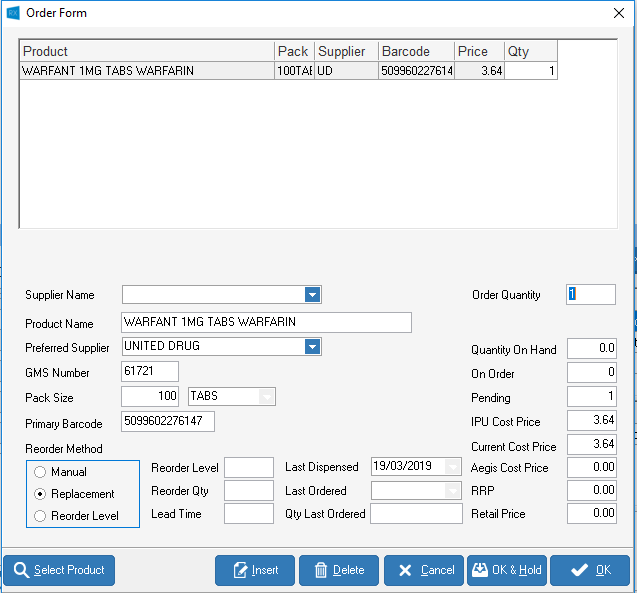
- ORDER ITEMS has the same functionality as QUICK ORDER which is accessed by pressing F7 on any screen.
- Handle Not Given
If the patient is not receiving the item on the script please use Not Dispensed
Items that are going to be dispensed to the patient in the very near future ( i.e. they will come back for the item the next day ) can be set to Not Given.
- This item will be set to the colour pink and will be moved to the top of the PMR.
- If you edit a script that includes a Not Given item we presume the patient has returned so we take the item off Not Given
- Emergency Hormonal Contraceptive Legislation July 2017
From 1 July 2017, female medical card holders will be able to obtain Emergency Hormonal Contraception (EHC) directly from their pharmacist, without a GP prescription, following a pharmacist delivered consultation.
The current version of TouchStore Rx does not yet encompass all of the required functionality for this legislation however you can use the below steps to dispense and claim for a product under the EHC legislation.
Please be advised that you must have applied the July 2017 IPU Changes file to your TouchStore Rx system or manually created the "EHC CONSULTATION" products in order to correctly claim for these dispenses.
There are three steps you will need to follow:
- Set up the Pharmacy as a Prescriber
- Dispense the Consultation Product
- Dispense the EHC Drug (if applicable)
To set up the Pharmacy as a Prescriber, follow the steps for Professional (Doctor) Maintenance and insert a new Professional to your TouchStore Rx.
Ensure to set their GMS Number to be that of your Pharmacy's GMS Number.
- To dispense the Consultation Product, visit the patient's PMR file and click New Script.
Depending on whether you will be supplying the patient with the drug or not following on from the consultation, search for one of the below products.
| Product Name | GMS Number |
|---|---|
| EHC CONSULTATION - WITH SUPPLY | 79996 |
| EHC CONSULTATION - WITHOUT SUPPLY | 79997 |
If you have never dispensed the EHC CONSULTATION product before you may need to hit F8 on your keyboard to change the search filter to Active Products.
- Set the DISPENSED quantity to 0.
- Set the PRESCRIBED quantity to 1.
- Ensure the OWED quantity is 1.
- Untick the € tickbox to ensure we do not charge a GMS Levy for this item.
- Set the PRESCRIBER for the product to the Professional you set up earlier for your pharmacy.
If, following on from the consultation, you will be dispensing an EHC drug to the patient, you will need to dispense it within the same script as the EHC CONSULTATION product.
- Search for the drug and dispense it as normal.
- Do not dispense it as an Owing like the EHC CONSULTATION product.
- Set the PRESCRIBER for the product to the Professional you set up earlier for your pharmacy.
Below you will see an example of a script where an EHC CONSULTATION product is dispensed alongside an EHC Drug.

Once you are happy with the details on the script, click COMPLETE.
In the current version of TouchStore Rx you will now get a Bag Label with a GMS Levy for the EHC Drug.
Note: Unfortunately there is currently no workaround within the system for this so we recommend that you make a note on the patient's PMR that there is an incorrect GMS Levy being charged to them this month so that other staff will bear this in mind for any future dispensing to the patient.
Claim Defender
CLAIM DEFENDER is a screen which will appear if you are dispensing an item which may be rejected by the PCRS when you send your CLAIM.
An example of this is Viagra, only 4 should be dispensed in any given month.
In the image below I attempted to dispense 6 tablets.
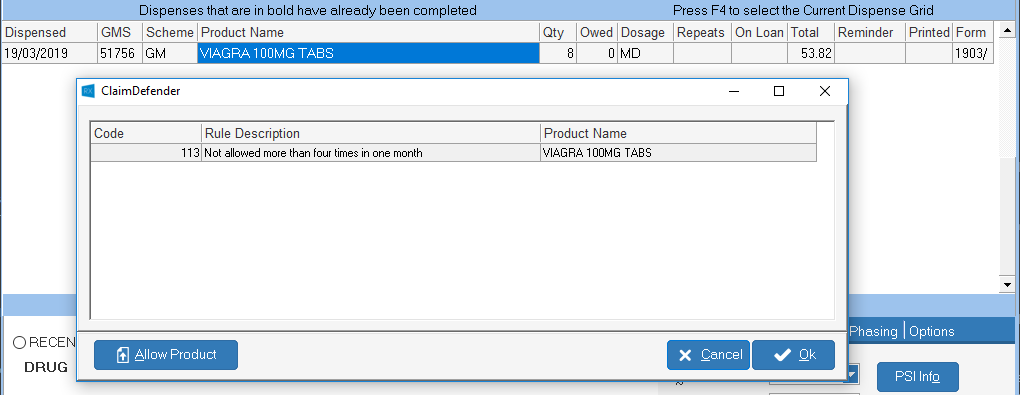
The CLAIM DEFENDER screen will give you the rule code, the description of the rule and the name of the item being dispensed.
- If you wish the rule not to apply to this item and patient in future you can click the ALLOW PRODUCT button
- Press YES and OK or use KEYBOARD SHORTCUT ALT and A then Y, followed by ALT and O. You will then be asked to input your PIN.
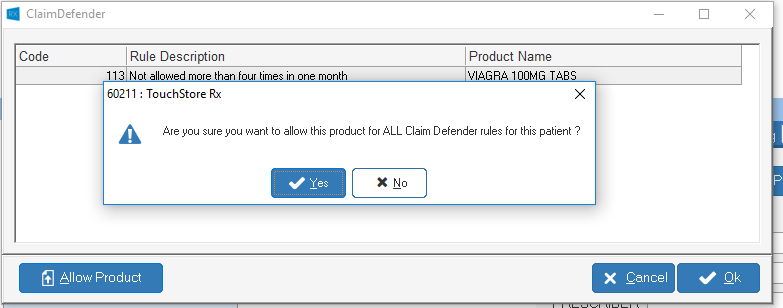
NOTE - These RULES are displayed as per the PCRS.