Search for a Patient
- Quick Search
To find a patient on the system and navigate to their Patient Medication Record (PMR):
- Login to TouchStore Rx

- Click Start or press (KEYBOARD: F2)
- Press (KEYBOARD: F2) and type the patient's name (in the format:
SURNAME, FIRSTNAME)- If you only know part of the patient's name you can use SPACES or % to indicate a wildcard e.g. any sequence of characters can follow what you have entered
- E.G.
JAM%will return anyone whose surname begins with JAM like "JAMES" or "JAMESON"

- You can either use the Arrows on the keyboard or the mouse to select the correct record
- If using the keyboard, press (KEYBOARD: ENTER) to open the patient record you selected
- The PMR Console will now open the selected patient's file

- Advanced Search
If you have multiple patients with similar names or you need to search using different information than the patient's name e.g. Form Number, Product Name etc... you can make use of the Advanced Search screen.
To use Advanced Search:
- Click Search or press (KEYBOARD: ALT + A)
- You can also press (KEYBOARD: F2) twice
- This will bring up the Select Patient screen
The Standard Search tab is selected by default
Here you can search based on a number of different column headings
To search based on different columns:
- Click on the Column Heading in the list e.g. Reference and it will move to the left hand side of the screen, indicating that it is the field that the search is using at the moment
- In this screen you can search based on:
- Full Name
- Reference
- Phone Number
- Address
- PPSN
- First Name
- Town
_N.B. if your system has the Show Eircode option enabled then the Address shown will include the Eircode and so this can be used for searching also. Please see our Config section for more information on this setting.
The Advanced Search tab allows you to search based on different criteria such as Form Number and Product Name.
To use the Advanced Search tab:
- Click Advanced Search or press (KEYBOARD: ALT + A)
Here you will find three different search options:
Scheme and Reference Number
- This option is selected by default
- This allow you to search for patient's based on a particular Scheme and Reference number e.g. General Medical Services and
1234567A - Choose a scheme from the Scheme dropdown
- Enter a reference number in the Reference box
- Click Search and after a few moments any patients that match against that search should show up in the list

Dispense Script Form Number
- If you need to find a patient but all that you know is the Form Number of a script dispensed to them you can use this option
- In the Form Number box type in the form number for the script
- Form Numbers are in the format of DR2002/0357
-
These print out on Prescription Receipts and are visible on a patient's PMR

Product Dispensed
- If you need to find a patient but all that you know is that they received a particular item, you can use this option
- In the Product box, type in the name of the item you want to search for any patients who it was dispensed to
- In the Dispensed From and Dispensed To box fill in the relevant dates for your search
- You can use the All / On Loan / Owings / Phased radio button to specify if you only want to search for particular kinds of dispenses. E.G. Phased will only show you patients who have a phased dispense for the chosen item with the specified date range.

Create a new Patient
To create a new Patient:
- Click into the Patient Search box or press (KEYBOARD: F2)
- Type in the patient's Name (in the format:
SURNAME, FIRSTNAME) and press (KEYBOARD: ENTER) - The system will then ask "Do you wish to create a new patient ?"
- Click Yes (KEYBOARD: ALT + Y)

- The system will then create the new Patient record
- You will then be brought into the Edit (F3) Patient Maintenance screen

Before you can continue you will need to complete these required steps:
- Enter a First Name and a Surname
- Add at least ONE (1) Scheme
- Choose the Patient's Default Scheme
- Select the Patient's Doctor
Add a Scheme to a Patient
In the Edit (F3) screen the Schemes / Refs box shows you the list of any existing Schemes that have been assigned to the patient.
A patient requires at least ONE (1) Scheme in order for them to have Dispenses added to their PMR.
Different Schemes will have different criteria for usage and, in some cases, different pricing applied to items dispensed under them.
The Schemes / Refs section holds the following pieces of information about a Scheme assigned to a patient's record:
- Scheme Name: the name of the Scheme in question
- Card No.: the Card Number of Reference Number for this Scheme for this Patient e.g. a GMS Medical Card number
- Month: if the Scheme has an expiry date, this is the Month of Expiry
- Year: if the Scheme has an expiry date, this is the Year of Expiry
- HT Link: this tickbox is used when linking a High Tech Scheme to another applicable Scheme
To add a new Scheme to a patient's record:
- Navigate to the Patient's PMR
- Open the Edit (F3) window by clicking Edit (F3) on the PMR or by pressing (KEYBOARD: F3)

- Click the Insert Scheme button
- A new line will be added in the Schemes / Refs box for the new Scheme you are adding
- In this new line:
- Click the dropdown arrow in the Scheme Name column and choose the type of Scheme you want to add
- If there is a Card Number or Reference for this Scheme for this Patient, type it into the Card No. column
- If the Scheme has an expiry date, enter the Month of Expiry in the Month column
- If the Scheme has an expiry date, enter the Year of Expiry in the Year column
Link a Family-based Scheme
If a patient is part of a GMS or DPS Family, you will likely want this to be reflected in the system so that the patient is charged the correct amount for dispenses within a given month.
- GMS Family
To link a patient as part of a GMS Family, there are TWO (2) methods:
- Via the Card Number
- Via the Family Tab
Via the Card Number:
For a GMS Family, the system will automatically recognise that patients are part of a GMS Family if the first SEVEN (7) characters of the Card No. for the GMS Scheme for those patients match.
Please note there are a number of GMS-type schemes that can also cause patients to be considered to be part of the same GMS Family, e.g. Hospital Emergency, GMS Dental.
The system will also match against these Schemes if the Card No. for each patient is similar.
Via the Family Tab:
There are times when a GMS Family consists of patients who have different Card Numbers.
For example a married couple who both had GMS Medical Cards in their own names prior to getting married will have different Medical Card numbers but when they are married they will be considered part of the same GMS Family.
In these cases instead of the system being able to automatically link patients we will need to manually tell the system that Patient A and Patient B are part of a GMS Family.
To manually set up a GMS Family for the first time:
- Choose a patient in the family to act as "Head of Family" - it doesn't matter who it is, we just need to pick one person in the family
- Navigate to that patient's PMR
- Click Edit (F3) or press (KEYBOARD: F3)
- Select the Family tab (KEYBOARD: ALT + F)

- Click the Head of Family button
N.B. If there is no Head of Family button then the patient is already part of a family in the system
- You will now see that the Family Identifier box is populated with the ID of the patient
- This ID is what is used to specify that patients are part of the same family e.g. patients who share the same Family Identifier ID will be considered to be in the same family
- You will now be able to Link patients to this family
To add a patient to an existing GMS Family:
- Navigate to the patient's PMR
- Click Edit (F3) or press (KEYBOARD: F3)
- Select the Family tab (KEYBOARD: ALT + F)

- Click the ... button beside Family Identifier and search for the "Head of Family" patient
- Select the "Head of Family" patient in the list and click OK or press (KEYBOARD: ALT + O)
- The Family Identifier will now be populated with that patient's ID
- Now you will need to specify the Relationship that this patient has to the "Head of Family" e.g. Brother, Daughter etc...
- Click the Relationship dropdown and choose the relevant option
- Once you select an option you will see the family list box at the bottom of the screen populate with the list of other patients in the Family

- DPS Family
To link a patient as part of a DPS Family, there is only ONE (1) method:
- Via the Card Number
For a DPS Family, the only way that the system can recognise that patients are part of a DPS Family is if the first SEVEN (7) characters of the Card No. for the DPS Scheme for those patients match.
Link the High Tech Scheme
Many patients often receive items under the High Tech Scheme that are technically processed as part of a different Scheme e.g. GMS. To set up a patient's High Tech Scheme as being linked to another scheme in this way:
- Navigate to the Patient's PMR
- Click Edit (F3) or press (KEYBOARD: F3) to edit patient information

-
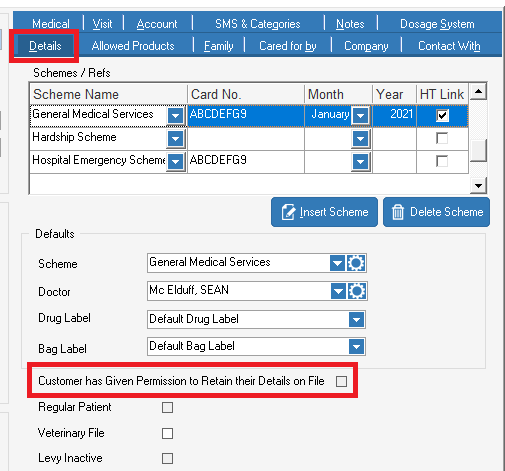
Under the details tab, ensure there is only one 'HT Link' box ticked.
-
Only tick the scheme that you are linking the High Tech scheme to
- Example - if you are linking High Tech and GMS, the GMS and High Tech schemes will share the same Card number and the GMS scheme will have the HT Link box ticked as shown below:

-
-
Enter the Card No. for the High Tech scheme as the same Card No. from the Scheme you are linking it to
- You can see in the above screenshot, GMS and High Tech have the same Card No.
- If you do not enter the same Card No. the system will give you a message and advise you of this issue
- Click Ok or press (KEYBOARD: ALT + O) to save and return to the PMR
It is possible within the system to link a High Tech scheme to the following schemes:
- Drugs Payment Scheme
- General Medical Services
- High Tech
- To link High Tech to itself, enter
Tas the Card No. and tick the HT Link box against the High Tech scheme itself
- To link High Tech to itself, enter
- Hospital Emergency
- Long Term Illness
Set the Default Scheme for a Patient
When clicking Insert on the PMR to begin dispensing to a Patient, the system will always use the Default Scheme assigned to the patient's record.
If you wish to change this what this default is set to:
- Navigate to the Patient's PMR
- Open the Edit (F3) window by clicking Edit (F3) on the PMR or by pressing (KEYBOARD: F3)
- In the Defaults section click the dropdown arrow beside Scheme
- So long as the patient has more than ONE (1) Scheme assigned to them you will be able to choose a different scheme in this dropdown
- Click the Scheme in the list you would like to use instead
- Click OK and your changes will be saved
From now on, when inserting new Dispenses to this patient's PMR, the newly chosen Default Scheme will be chosen.
Additionally, when opening this patient's PMR, the Default Scheme will be shown at the top of the PMR. For public Schemes such as General Medical Services, Long Term Illness etc... the Default Scheme will carry out an automatic check against the HSE Scheme Checker web service and give you a traffic-light style colour indication of the validity of the Scheme information entered for the patient.
- Scheme Checker Colours
Valid Card Number
If the Card Number is found on the HSE system, the Default Scheme will flash a healthy green:

Invalid Card Number
If the HSE have not been able to find this card in their own records the Default Scheme flash red:

This will also be the case for a previously valid card that has now expired:

GP Visit Card
In the case where a card is found but it is valid only for GP Visits and not for dispensing under the GMS Scheme then the Scheme Checker will flash purple:

Merge Patient records
If you find that you have the same patient set up more than once on the system and you wish to merge the PMRs together you can use the Merge function in Edit (F3) to complete this.
N.B. Please note that merging is NOT REVERSIBLE. TouchStore cannot undo the merging of patient records once it has been completed
- Navigate to the Patient's PMR of the patient you wish to overwrite
- Click Edit (F3) or press (KEYBOARD: F3)
- At the bottom of the Patient Maintenance click Merge

- You will now be shown the Merge Patient screen:

- The top half of this screen will show you the current patient who will be overwritten by the merge process
- Next you will need to search for the patient whose details you wish to keep
- Click Search or press (KEYBOARD: ALT+S) at the bottom of the screen and search for the patient record you wish to keep
N.B. If both files are too similar to tell apart we would recommend changing the names on them to mark them in a way that lets you tell them apart
- Once you have select the patient you wish to keep, click Merge or press (KEYBOARD: ALT + M)
- The system will then you show you an EXTREMELY important notification

- This notification will show you your two chosen patient record and their IDs
- Please ensure that they have two different IDs so that you know you are merging two different patient record
- Once you are happy to proceed with the merging process click Merge or press (KEYBOARD: ALT + M)
- Click Yes to the are you sure? Pop up.
- You will then get a pop up to let you know that the process is now complete.
Once the process is completed you will see that the patients have merged together but the schemes have also merged so you may need to delete a particular scheme if it is showing up more than once.

If you see a duplicated scheme then highlight any one of the duplicates and click Delete Scheme.
N.B. leaving duplicate schemes present on a patient's PMR will causes future issues with Claiming and Searching so please ensure to remove duplicates before moving off the patient's PMR!
Add a Note or Warning to a Patient
When entering a patient's PMR you may want to have certain information noted on their file for future reference or you may want an explicit warning to appear to staff to advise them of important information relating to the patient's care.
On a patient's PMR on the top right hand section of the screen you will see a box with the headings Notes and Warnings.
By default, the Notes tab will be open and will display any notes that have been added to the patient's PMR.

- Patient File Notes
To insert a Note to a patient's PMR:
- Navigate to the patient's PMR
- On the top right hand section of the PMR, click into the text field underneath the Notes tab.
- You can type in new notes or amend existing notes in this text box
- Once you are happy with the notes you have entered or amended, once you close out of the patient's PMR, these changes will be saved and will be available the next time someone enters the patient's PMR
N.B. If there is too much text in the Notes field for you to easily view, simply double-click any of the text in the Notes text box and it will open a larger version of the notes section, allowing you to see more of the text at one time:

There is more functionality available around Notes in the Edit (F3) screen:
- Click Edit (F3) or press (KEYBOARD: F3)
- Select the Notes tab

Here, under Notes you will see a larger version of the same text box shown on the PMR that will allow you to type in or amend text as needed
Additionally there are two additional fields you can use to track information about your patients:
Status - the status dropdown can be used to record any status about the patient you wish.
- E.G. you may want to track the "Smoker/Non-Smoker" status of your patients for work you are doing towards Smoking Cessation. This Status list will allow you to enter custom statuses.
- To add a value to the list e.g. "Smoker" or "Trying to Quit" simply type the value into the text field then press (KEYBOARD: ENTER)
-
You will then see a confirmation dialog asking you: "Do you wish to insert this new value to the current list ?"

-
Click Yes or press (KEYBOARD: ALT + Y) and the new value will be added to the patient's PMR and will be available for future use
Category - the Category dropdown can be used to group patients into any type of category.
- E.G. the patient is Diabetic, the patient is a Christmas Club member, the patient is allowed credit. This Category list will allow you to enter custom categories.
- To add a value to the list e.g. "Diabetic" or "Christmas Club" simply type the value into the text field then press (KEYBOARD: ENTER)
-
You will then see a confirmation dialog asking you: "Do you wish to insert this new value to the current list ?"
-
Click Yes or press (KEYBOARD: ALT + Y) and the new value will be added to the patient's PMR and will be available for future use
- Patient File Warnings
To insert a Warning to a patient's PMR:
- Navigate to the patient's PMR
- You can now add the Warning in one of two ways:
- Via the PMR
- Via Edit (F3)
Via the PMR:
- On the top right hand section of the patient's PMR click the Warnings tabclick on warning and enter you warning in the box provided then click alert. You can also have this PIN-protected by clicking Conf Req(confirmation Required).
- When Conf Req is enabled, then anyone navigating on to the patient's PMR will be shown the warning message you have entered and must enter their PIN number in order to close out of the warning message.

Via Edit (F3):
- Click Edit (F3) or press (KEYBOARD: F3)
- Select the Notes tab
- In this screen you can manage both the Notes and the Warnings attached to the patient's PMR

- In the lower section of this screen you will see the Warnings section
- Click New to add a new warning record (KEYBOARD: ALT + W)
You will now need to enter the following pieces of information:
- Date: this will automatically populate with the current date however you change it by clicking into the date and then clicking the small button that appears beside it which will show you a Date Picker allowing you to select the date you wish
- Warning: this is the text of the Warning you wish to enter e.g. "Xarelto stopped 24.9.2019, check with GP for new script"
- Alert: this tickbox controls whether the Warning will pop up on the screen when someone enters the patient's PMR.
- Current: this tickbox can be used to ENABLE or DISABLE the warning e.g. if you no longer want the Warning to pop up if Alert is ticked but you do not want to delete the Warning for future reference.
- N.B. If this is unticked, even if Alert is ticked, it will not pop up when entering the patient's PMR
- Conf Req: this tickbox controls whether the Warning requires a PIN number to be entered in order to close out of it.
- N.B. If Alert is not enabled then this setting will not have any effect.
- Staff - this will automatically populate with the name of the staff member who is logged in, based on the PIN that was last entered.
Once you are happy with the information you have entered, click OK or press (KEYBOARD: ALT + O) to close the Patient Maintenance screen and save your changes
Add a Medical Condition or Allergy to a Patient
Similar to Patient File Notes and Patient File Warning, you may want to add a record of Medical Conditions or Allergies that a patient suffers from to their PMR.
To add a Medical Condition:
- Navigate to the patient's PMR
- Click Edit (F3) or press (KEYBOARD: F3)
- Select the Medical tab or press (KEYBOARD: ALT + M)
- In the top half of the screen you will see Medical Conditions

- Click into Medical Conditions and then press (KEYBOARD: INSERT)
- You will then see a dropdown box appear
- To choose an existing Condition, press the dropdown arrow and select an item from the list
- To add a new Condition to the list, simply click into the dropdown box and type in the new Condition
- Click OK or press (KEYBOARD: ALT + O)
N.B. These Conditions are just for staff reference. There is no functionality in the system that will make use of this information.
To add an Allergy:
- Navigate to the patient's PMR
- Click Edit (F3) or press (KEYBOARD: F3)
- Select the Medical tab
- In the middle of the screen you will see Allergies and Contraindicated Conditions
- Click New or press (ALT + W)
- You will then see the Search Product window appear

- Here you will need to search for a product that the patient has an allergy to
- Search for the drug and then click Select or press (KEYBOARD: ALT + S)
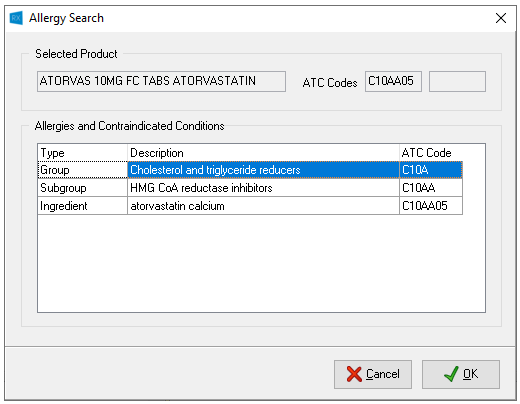
- You will then be brought to the Select Allergic or Contraindicated warning ATC Code screen

- Here you will have the option to choose whether the patient is allergic to (A) the Group, (B) the Subgroup or (C) the Product.
- Highlight the relevant record in the list e.g. Group, Subgroup or Product and then click OK or press (KEYBOARD: ALT + O)
- You will now see that the option you have chosen has been added to the patient's list of Allergies and Contraindicated Conditions
When dispensing any drugs whose ATC Code matches the Group, Subgroup or Product that has been added to thr patient's list of Allergies and Contraindicated Conditions you will see the Allergy or Contraindication Interaction window appear advising you that the patient may have an adverse interaction with this drug:

LTI Conditions
Rx 365 provides an integration between the LTI Core Lists of allowed products for certain Medical Conditions that patients on the Long Term Illness Scheme are eligible to receive and the pharmacy is eligble to claim reimbursement for. The PCRS-provided LTI Core Lists of allowed products are made available to Rx 365 users via the IPU File along with the list of eligible LTI Conditions that these products are available under.
In order to make full use of this functionality, which ties into our Claim Defender rules to help assist customers in avoiding Claim Rejects (see our Claim Defender section for more info), users can add an LTI Condition to a patient so that Rx 365 will know which products the patient is allowed to receive under the Long Term Illness Scheme and which products the pharmacy can claim reimbursement for.
To assign an LTI Condition to a patient:
- Navigate to the patient's PMR
- Click Edit (F3) or press (KEYBOARD: F3)
- Select the Medical tab
- At the bottom of the Medical tab you will see the LTI Conditions section

- Click into the Condition section and choose from the list of available LTI Conditions
- N.B. the Code will automatically update so you only need to choose the Condition from the list
- The Date Assigned will auto-populate to let users know in the future when exactly the LTI Condition was assigned to the patient
Once an LTI Condition is assigned a patient any subsequent dispenses under the Long Term Illness Scheme to that patient will check against the LTI Core List for that patient's conditions and any that are not confirmed as allowed and reimbursable will be flagged by Claim Defender as possible Claim Rejects.
LTI Allowed Products
In addition to the LTI Conditions and LTI Core List functionality described above, Rx 365 also allows users to manually add products to an Allowed Products list for Long Term Illness patients. When dispensing to the Long Term Illness scheme, Claim Defender rules will check the list of Allowed Products for a given patient and will not flag these products as possible Claim Rejects. This allows users to maintain a separate list of products manually in the event that there are certain items that have been successfully claimed for the patient but are not yet part of the listings made available to Rx 365 via the IPU File.
To add products to a patient's Allowed Products list:
- Navigate to the patient's PMR
- Click Edit (F3) or press (KEYBOARD: F3)
- Select the Allowed Products tab

- Any products already added for this patient will show up here
- To add a new product, click Add Product
- A product search window will appear - search for the product you wish to add then click Select
- To remove a product from the list, highlight the product and click Delete Product
Delete a Patient
N.B. Please note you can only delete patient records that have not yet had any dispenses entered. You cannot delete a patient once they have had an item dispensed, even if that item has been deleted.
To delete a Patient record that was created in error and had no dispenses entered against it:
- Navigate to the patient's PMR
- Click Edit (F3) or press (KEYBOARD: F3)
- Right-click anywhere within the Edit (F3) window or press (KEYBOARD: SHIFT + F10)
- Select the Delete Patient option
- The following message will appear, "You are about to remove this patient from the system. Are you sure you wish to delete this patient?"
- Click Yes or press (KEYBOARD: ALT + Y)
The selected patient is now deleted.
Configure SMS for a Patient
Rx 365 and TouchStore Rx support automated SMS generation to notify patients when their scripts are ready for collection or when a new prescription is required for repeat scripts.
There are a number of general configuration settings that control this functionality for the entire system. Please see our SMS section for more information on those settings.
Patient Locks
Rx 365 and TouchStore Rx provide a security function to prevent corruption of patient data in a pharmacy using dispensary software on multiple PCs whereby patient PMRs are locked when they are opened on one PC so that they cannot be opened on another PC. These "Patient Locks" ensure that only one change is being made to a PMR at one time, otherwise confusion, duplication and corruption of information on the PMR could result. Upon closing the application normally or moving to another patient's PMR, the Patient Lock for the previous PMR is removed, allowing access to them from other PC.
When attempting to open a PMR that is locked on another PC the following message will appear:

This message will show the Windows PC Name of the PC that the PMR is open on to help identify which PC in the pharmacy is causing the lock. Closing the software or navigating to a different patient PMR on that PC will allow the file to be opened on other PC.
In the event of an unexpected closure of the dispensary software where a Patient Lock has not been removed correctly, the Remove Lock option will appear when trying to access the locked patient's file. Clicking this will remove the lock and allow access to the PMR.
GDPR and Permission to retain Data
As part of GDPR rules it may be necessary in some situations to make note against a patient's PMR that they have explicitly given their permission for the pharmacy to retain their personal data.
The Edit F3 screen under the Details tab has an option labelled Customer has Given Permission to Retain their Details on File that can be used to keep track of this. Simply check the box to confirm that the patient has given their permission.
Patient Filing Index
Many of our customers operate filing systems for keeping track of patients records and/or pre-prepared dispenses. To aid them in managing this system they often opt for using "ad hoc" processes to note the "Filing Index" against a patient e.g. the index or code that tells a technician where in their filing system they can find a patient's details / dispenses.
In the Edit F3 screen on the Notes tab, users can make note of their Patient Filing Index using the PFI field:

This will then be displayed on the patient's PMR underneath their DOB:

Filtering the PMR
The patient PMR contains a list of all items dispensed to a patient. Depending on the size of the list and the user's need it may be necessary to filter this list.

The following filters are available at the top of the PMR to narrow down the list of historical dispenses:
- All Dispenses
- This is the default filter for all PMRs and will display all dispenses
-
ATC Code
- This filter will allow the user to specify an ATC Code and the PMR will then only show dispenses for products containing that ATC Code
- By clicking ATC Search the system will prompt the user to search for a product that contains the ATC Code in question. This will then display the following screen where the user can choose which part of the ATC Code they wish to search based on e.g. Group, Subgroup or Ingredient
-
Deleted Drugs
- This filter will allow the user to see the list of items previously dispensed to the patient but then subsequently deleted
- N.B. it is not possible to repeat or edit deleted dispenses
- Dispense Type
- This filter will allow the user to filter the PMR to show only the following types of dispenses:
- On Loan
- Owings
- Phased
- Not Dispensed
- This filter will allow the user to filter the PMR to show only the following types of dispenses:
- Dispensed Date
- This filter will allow the user to specify a From and To date range and the PMR will only show dispenses within that date range
- Select your From Date and To Date then click Run
- N.B. this filter is based on the Dispense Date so an item entered on 29th April but forward dated to have a Dispense Date of 1st May will only show up for date ranges containing 1st May
- Generic Name
- This filter will allow the user to free-type the name of an ingredient / generic and click Run to filter the PMR to only show dispenses of products containing that ingredient
- Prescriber
- This filter will allow the user to select the Prescribing Doctor from the list of Doctors on the system and the PMR will then only show dispenses where the chosen Doctor is the Prescriber for the item
- Product Name
- This filter will allow the user to free-type the name of a product and click Run to filter the PMR to only show dispenses of products that match the name entered
- Scheme
- This filter will allow the user to select a Scheme and the PMR will only display dispenses made under the selected Scheme
- Selected Drug
- This filter will allow the user to highlight a product from the PMR and then choose this filter to only display dispenses of that product
Show Historical Dispenses
Once the list of historical dispenses on a patient's PMR goes past 12 months ago, any older dispenses are automatically hidden in order to make the PMR load faster and keep from overwhelming the user with years of dispenses.
If at any time the user needs to view historical dispenses, clicking the Hist button at the bottom of the PMR will display ALL dispenses for that patient

N.B. the Hist button will display the number of currently shown items versus the total number of items against the patient's PMR - if these are ever not matching, then you know there is more history to be seen on the patient's file!
Show / Hide columns on the PMR
The patient PMR contains a lot of information and some of it may be more or less relevant depending on the pharmacy and the type of patient. This means that users may sometimes wish to add or remove columns on the PMR for quick visibilty of information about dispenses.
The following columns are always displayed and cannot be hidden:
- Dispensed - this shows the Dispense Date of the items
- Form No. - this shows the Form Number of the script
- Product Name
To the far left of the column headings on the PMR there is a button for the Column Selector.

The Column Selector allows the following columns to be shown/hidden:
- Qty - this shows the Dispensed quantity
- Owed - this shows the current Owed quantity
- Dosage - this shows the Short Code instruction for the item e.g. "T1D"
- Rpts - this shows the Repeat information for the item e.g. 3/5
- Prescriber - this shows the Prescribing doctor for the items
- Notes - this column shows a tickbox if there are Notes against the item
- Price - this column shows the total Private cost of an item
- N.B. for GMS items, this will never show the Levy Amount as this is always the Private cost
- Claim - this shows the current status of this script in the Claims process - please see our Claims section for more information
- Phase - this shows the phasing information of the item as currently dispensed phases versus total phases e.g. 1/4
- Filed - this column is no longer used and can be ignored
- Cycle Date - MDS / Nursing Home only - this shows the selected Cycle Date for the items