Here you will find details on how to view, create and edit Products on your system and how to maintain all of the various details related to your products.
Create a Product
- To create a product on Rx 365 we can search/scan the barcode of the new product in the top Product Search Bar

- If the system does not recognise the barcode the dialog box displayed below will appear, allowing you to begin setting up the product

- Click 'Yes, let’s create one!' and you will be brought to the Create a New Product screen, displayed below

- Enter the Product information
- Click the 'Create' button
Please Note : There is a Touchstore Master Product File which may contain your product. If it does contain your product, it will display the following message:

From here we can do the following
- Import the Touchstore Master Product File product information
- Manually enter the product Information
1. Import Product Information
To import the product information press Yes, import the details.

The system will then populate all of the product information with that pulled from our master product file. Any product details can be edited after the import.
2. Manually enter the Product Information
If you would like to insert all product information press 'No thanks'

Once the product has been created you will be brought to the Product Maintenance screen which allows you to configure your product in more detail. (We can access this Product Maintenance screen at any time by searching the product name in the main screen)
As displayed below, the Product Maintenance screen is split into 9 different tabs

Product Page
When you scan a barcode into the top search bar, or type in a product name in the top search bar and select a product, or when you choose "Go to Product" from Advanced Search or Reports, you will be brought to the main Product Page for that product.
This is where you can carry out Product Maintenance to update or view information about Products e.g. Cost Price, Preferred Supplier etc...
- General Information
The following functions are available at the top of the screen:

Dispense Trends
- This function will display a graph of the number of dispenses of this product over the last two years, comparing month by month.

Clone
- This function will copy the key pieces of information about this product into a new "cloned" version of the product to allow you to quickly create a new similar product if needed.

Merge
- If you find that this product is a duplicate of another product record on your system, you can use this function to find the other duplicate product and merge the two together. This will display information clearly stating which product will be overridden by which and which information will be preserved or overwritten.

The rest of the General Information page shows the following fields of information:
- Product Name
- Pack Size
- Manufacturer
- Supplier
- IPU Cost Price
- VAT Rate (ROI)
- PCRS Price
- Reference Price
- GMS Number
- Generic Name
- Strength
- Group
- Status
- Status Since
At the bottom of the page you will see a message in blue text stating which store created the product. This is useful in Head Office / Local Store scenarios.

The final function on this page is the Save Product button at the very bottom.
This will allow you to save any changes you may have made on this product.
- Order Info
This tab alows us to configure the ordering information associated with the product.

The followng order information can be altered:
- Supplier
- Reorder Method
- Reorder/replenish level
- Min Qty to order
- Expected Bonus Qty
- Supplier Ref
- Reorder Qty
- Expected Disc %
The current order status of the product is also shown. If there any current order lines for this product it will be shown here:

- Pricing
This tab allows us to configure all price related settings for the product. The screen is divided into 3 sections, all of which are displayed below and for these we can
- Update Cost prices

- Add a New Cost Price

- Dispense Price Points

- Add a Dispense Price Point
Price Points allow you to specify a Dispense Fee and a Markup Rate for individual products that may be different to those assigned to the Scheme they are being dispensed under. If a product has a Price Point set up, it will use those settings instead of the Scheme settings, unless the Scheme is set to Override Price Points.
To assign a Price Point to a product:
- Click on the
 button
 - The Dispense Price Point Maintenance window will open

- Enter the correct, applicable details
- CLick the
 button
 - If a field does not contain the required value, you can add it by clicking the
 button
 - This will open a "Add new value to list" window

- Fill in all three fields, and complete by clicking the
 button
- Stock
The Stock tab allows you to:
- Adjust the quantity on hand

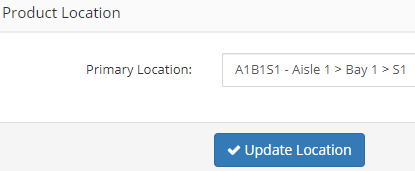
- Allocate Primary Location
- View Stock levels per store
- Stop Tracking Stock Levels For This Product
Please Note 'Stop Tracking Stock Levels For This Product' can be selected if you no longer want to track stock levels for this product. This will mean that the product will no longer show up in stock reports, orders or stock takes.

N.B. It is important that you bring the Qty on Hand to ZERO (0) for products that you want to stop tracking the stock level of, otherwise these products may continue to show up on stock-related reports.
- Stock Movements
This page displays a list of all changes to the Qty on Hand of the product in the current store. This includes Dispenses given out, deleted or edited and also includes changes based on Orders being booked or manual adjustments of stock.

- Categories
In the Product Categories page you are able to view and edit the Sales Group that the product has been assigned to e.g. Baby Dept L1

To change the Sales Group against a product you can either click the X to remove the existing Sales Group or the pencil icon to edit the existing one.
You can either type in the name of the Sales Group you want to assign to the product or use the dropdown boxes to choose the different levels of Sales Group you to assign to the product.
Once you are happy with the Sales Group you have applied, simply click Save Categories.
For more information on Categories and Sales Groups please see the Config section of this Help File under the Stock Categories section.
- Barcodes
This page displays information about the barcodes assigned to the product. Barcodes are one of the key pieces of unique information about products that help the system to uniquely identify them.
There are two types of barcodes supported in Rx 365:
- EAN-13 aka Normal Barcodes
- IPU Codes
EAN-13 aka Normal Barcodes
Normal Barcodes consist of the EAN-13 format barcodes that can be found on the packaging of products e.g. 5012712003335.
You can add any additional barcodes that may be found on the packaging or that can be used to order or otherwise identify the product using the Add function, however the barcode must be between 8 and 13 digits long.

Please Note For any barcodes added that are less than 13 digits long, Rx 365 will automatically prepend enough zeroes (0) to the front of the barcode to make it 13 digits long.
You can also use the Generate In-House Barcode function to have Rx 365 automatically generate an EAN-13 barcode for use with the product.

You can use the red trash can icon beside a barcode to remove it, however there must be at least ONE (1) barcode against a product at all times, so you will be unable to delete the last barcode until you add another one.

IPU Code
An IPU Code is a barcode that is assigned by the IPU to a product. This barcode is not featured on the product packaging but is used in the IPU monthly updates to uniquely identify a product when changes are made to it or when a new product is added.
You can use the red trash can icon beside a barcode to remove it, however there must be at least ONE (1) barcode against a product at all times, so you will be unable to delete the last barcode until you add another one.

- Dispense Info
This page is broken into two different sections:
- Dispense Info
- IPU Details
Dispense Info
This section displays the following information about the product:
| Detail | Description |
|---|---|
| GMS Number | This is the GMS Number of the product that will be used when claiming the item for reimbursement from HSE PCRS. |
| Default Dispense Qty | By default Rx 365 will use the Pack Size of a product as the default Dispensed Qty when using the Insert function to dispense a product. If you would like to use a different value, you can specify it here and this value will be used instead of the product's Pack Size. |
| Batch Number | This setting is not currently used and can be ignored. |
| Expiry Date | This setting is not currently used and can be ignored. |
You will also see a check box labelled This product is allowed to have unlimited repeats. This function is not currently used and can be ignored.
IPU Details
This section will display information relating to the product as per the IPU, if it was part of the IPU update. As stated in this section, the information displayed has been populated by the IPU so if you have questions or issues on the content of this section we highly recommend contacting the IrIsh Pharmacy Union for more information.
Product Details:
| Product Details | Description |
|---|---|
| Product Name | The name of the Product/Drug |
| IPU Code | The IPU code associated with the Product/Drug |
| GMS Number | The GMS Number code associated with the Product/Drug |
| IPU Cost Price | The IPU Cost Price associated with the Product/Drug |
| PCRS Price | The PCRS Cost Price associated with the Product/Drug |
| Generic Name | The Generic Name of the product/Drug |
| Strength | The Strength of the product/Drug |
| Authorisation | The Authorisation Code of the product/Drug |
| Form | The method of Drug delivery |
| Poison Code | The Poison Code associated with the Product/Drug |
| ATC Code(s) | The Ingredients of the Product/Drug |
| Added | The Date the Product/Drig was added |
| Last Updated | The date the product details were updated last |

Warnings:
Here you will see any warnings that are associated with this product e.g. "Do not stop taking this medicine unless your doctor tells you to stop."
Ingredients:
Here you will see the various ingredients within the product and their associated ATC (Anatomical Theraputic Code) Codes. These ingredient details are what is used to determine if product have drug interactions with one another.
Counsels:
Here you will see any Counselling Codes that are associated with the product e.g. "V3: Not recommended for children under 13 years."
- Links
This page will display the Product Links group for the selected product. Please refer to the Product Links module Help File section for more information on Product Links.
On this page you can press Edit Product Link Set to editing an existing set of Links or press Create New Product Link Set and you will be brought into the Product Links module to add or edit the group of products.
For more information on adding / changing Product Links please see the Product Links section of this Help File.
- Advice
This page allows us to insert and edit advice messages to the product

The Advice option allows you to insert an advice message for any product. This will then appear on the patients drug label.
Select an existing advice message or type in an advice message and press Add

- Alerts
This page allows us to insert and edit Alert messages to the product
Alerts will appear on the screen every time the drug is dispensed.

Select an existing alert message or type in an alert message and press Add
Updating multiple Products
If you would like to make changes to the details of several products at once you can do this in the Advanced Search module or the Product Updates modules. go to Advanced Search, search for your products, press select all, press edit and Add Advice Message.