Stocktaking is a vital part of keeping any retail business profitable and efficient. TouchStore systems provide easy to use, powerful stocktaking functionality that will allow you to keep track of your stockholding across your store or group.
Below you will find information on the various steps involved in carrying out a stock take in your system.
Start a Stock Take
Before we can begin counting stock, we need to set up the Stock Take itself. This way we can specify whether we want to count the whole store or just a subsection of your product range.
When starting a Stock Take we need to specify:
- What the Stock Take will do to products
- What products are going to be included
To start a Stock Take:
- Navigate to the Stock Takes module
- If no Stock Take is currently running you will see the Start a new Stock Take screen

- Choose what the Stock Take will do to products
First, we need to choose the type of stock take you wish to perform – Selective or Zeroising:
- Selective: by choosing a "Selective Stock Take" the uncounted items are not zeroised at the end of a stock take. This option is used where periodic stock takes of random or specific products are done and / or you do not want to zeroise all products you have omitted. This means the only change that will occur to your products is when you assign them a Quantity.
- Zeroising: a Zeroising Stock Take will automatically zeroise all of the products included in the stock take that are not counted. This is useful if your stock figures are not correct and you want to put everything to Zero and only have figures for the stock you have actually counted. N.B. the Zeroising of uncounted stock only happens when you use the Click here to end this Stock Take function.
- Choose the products that will be included
Now that we have chosen what the Stock Take will do, next we need to choose the products that will be included in the Stock Take.
N.B. if a product is not part of the Stock Take, it will not be available to count and the system will warn you that the product is not part of the Stock Take. Any Quantities for these products must be applied manually in the product's Stock page.
Firstly, you have the option to specify if you want to count your entire product range. If so, tick I want to count my entire product range.

Next, you can then filter the list of products you wish to include in the stock take in four ways:
- Current Stock
- The Current Stock drop down can ignore stock quantities completely or limit it to positive or negitive stock. If you select Ignore Stock Quantities, the system will not look at the Qty on Hand of items when including them in the stock take. Only Negative Quantities will only
- Supplier
- If the product range you wish to include in the Stock Take is all under a particular Default Supplier, you can choose it here
- Category
- If the product range you wish to include in the Stock Take is all under a particular Sales Group, you can choose it here
- Last Counted
- If you want to include products that were last counted in a Stock Take before a certain date range
During a Stock Take
Please Note: - While a stock is in progress you will not be able to check in any orders
Additionally, while a Stock Take is underway and you are still selling products, the system will keep track of your sales and the stock adjustments from sales normally however if there is a count made on a product close to the time the product was sold we may add that product to a list of items that will be shown to you at the end of the counting to suggest that these items be double checked.
Counting Stock
- Manually Counting Stock
- Stock Sheets
- Scanning and entering
- Uploading a .CSV file
- Counting Stock with a Third Party
- Uploading a .CSV file
- Uploading a .HND file
- Counting Stock with a TouchStore Handheld
- Once you have clicked the "Start Counting" button, a screen similar to that displayed below will now appear.

This screen allows you to:
- Print Stock Take Sheets Press this button & the products withing the criteria you selected for the stock take will be generated onto stock take sheets which you can them print

- Enter Stock Take Quantities After filling out your stock take sheets you can then press this button & add the quantities,
You have to ability to save your progress on this screen & once you have entered all the correct quantities you can then press save

- Show Products Counted So Far Allows you to see what products have been counted so far from this screen you also have the option of doing a stock varience report

- Add Product to this Stock Take You can also count products by either scanning the barcode or searching for them by their name in the below search bar

- Each time you add a product to the stock take a window similar to that displayed below will appear

- You are given the option to either update or overwrite the stock level
- From here you can view the current stock of the product and enter the updated quantity of it in the ‘Stock Count’ text box
- Click the 'Update Quantity' button
Once Counting has been completed
LOREM IPSUM
End a Stock Take
-
Once you have counted all the products you wish to include in the stock take click the
 button
 -
The Stock Take Results page will then appear detailing all information relating to the stock take
Please note All products sold throughout the duration of the stock take will be featured in the ‘Products that need to be re-counted’ section. To ensure accurate results we advise that all products listed in this section are recounted

From here we can also run the Stock Variance report by clicking the ‘Stock Variance Report’ button.
- This report details the difference in quantity and value between each product count and the original quantity and value.
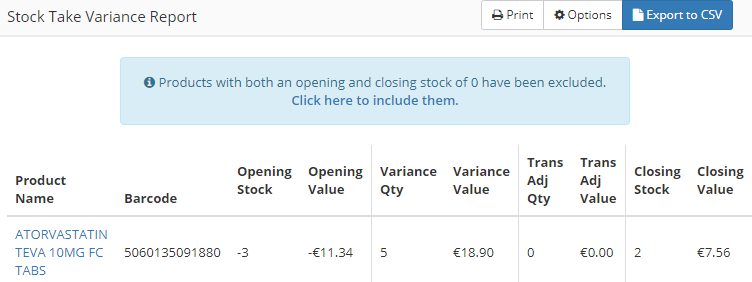
The "Stock Variance" report contains the following columns:
- Product Name
- Original Qty (the qty of the product at the start of the stock take)
- Original Value (original qty * average purchasing cost)
- Count Qty (the qty counted)
- Count Value (qty counted * average purchasing cost)
- Adj Qty (the non stock take adjustments - sales, etc.)
- Adj Value (adj qty * average purchasing cost)
- Closing Stock (current qty on hand)
- Current Value (current stock * average purchasing cost)
NB: The "Stock Variance Report" also displays a total in the "value" columns. For example – the Count value is the total value of that product that is currently in stock e.g. count quantity * average purchasing cost)
Please Note : The Stock Take Results screen can be displayed during the stock take. As a result, we can run the Stock Variance report at any point during the stock take by clicking on the "Show Products Counted So Far" button in the stock take screen and then the ‘Stock Variance Report’ button
View your Stock Take history
-
From the Rx 365 homescreen select the Stock Take module and click on the History tab
-
A list of all historic stock takes, similar to that displayed below will then appear

- We can view the Stock Variance Report for any of these historic stock takes by selecting them from the list. From here we are brought to the Stock Take result page and can click the 'Stock Variance Report' button to run the report
Back Office & Handheld- Stock Take/Zeroising Stocktake/Negative Stocktake
- You can carry out a stock-take on random products (selective stocktake) or you can carry out a stock take by category or by the supplier (zeroising Stocktake).
- Back Office - Selective Stock Take
- Sign in to the Back office
- Select 'StockTakes'.
- From the drop-down type field, select 'Selective Stocktake'.

- Press the start counting button- this initiates the stocktake
- Wait until the stocktake has started
- The Button 'Click here to end the stocktake' will appear on the screen when the stocktake has started.
- The handheld is now ready to use for the stocktake.
- Start scanning the products on the handheld.
- Checking what has been scanned so far on the stocktake.
- Open Rx 365
- Select Stock Takes.
- Select show what products have been counted so far.
- Products that have an incorrect count on them.
- Select Stocktakes
- Click on 'View Stock Variances' - this shows all products available in the stocktake
- Click on the options button located on the top right of the page.
- Click on Show variances only - this shows you the products you have counted where there is a difference between your expected stock level and your actual count.

- Add a product to the stocktake from the Back Office
- Sign in to the Back Office.
- Select Stocktake
- Scan in the barcode or type in the description of the product(s) that you want to add
- Type in the quantity of the product being added and select enter.
Back Office - Zerosing Stocktake
Note - This option means that at the end of the stocktake anything not counted will have their stock count put back to zero.
- Sign into Rx 365 Back Office.
- Select stocktakes
- From the Type dropdown select 'Zerosing' StockTake
- From Supplier or category choose what you are going to count.
- Press start counting.

- Wait until the stocktake has started
- The Button 'Click here to end the stocktake' will appear on the screen when the stocktake has started.
- The handheld is now ready to use for the stocktake. Start scanning the products on the handheld.
- Print off the sheets of the products to be counted in the stocktake.
- Press Print Stocktake sheets – this will give you all the products available for you to count.

- Check what has been scanned so far on the stocktake
- Open Rx 365 Back Office.
- Select Stocktakes.
- Click on show products counted so far.
- Look at the products that have an incorrect count on them
- Open Rx 365 Back Office
- Select stocktakes.
- Click on view stock variances - this shows all products available in the stocktake.
- Click on the options button on the top right of the screen.
- Click on show variances only - this shows you the products you have counted where there is a difference between your expected stock level and your actual stock.

- Add a product to the stocktake from the Back Office
- Sign in the Rx 365 Back Office
- Select stocktake
- Scan in the barcode or type in the description of the product(s) that you want to add
- Type in the quantity of the product being added and select enter.

- Completing the Stock Take.
- Sign in to Rx 365 Back Office.
- Select Stocktake.
- Click on ' Click here to end this stocktake'.

- Press' Yes I'm done counting' - This completes the stocktake.
- You will now get a summary of the stocktake.

- This will show all the products counted.
- Stock variances after the stocktake is completed
- Click on the Stock Variances button (top Right)
- This shows you all the products that were counted where there is a variance
- Products that need to be re-counted
- If a product is sold and counted in the same minute then the screen will flag these products to you that you may need to re-count them.
- Back Office - Stocktake – Negative Stocktake
- Sign into Rx 365 back office
- Select Stocktakes
- From the dropdown type - select Zerosing stocktake
- From current stock choose - only negative stock
- Press start counting

- Wait until it has started the stocktake.
- The Click here to end this stocktake will appear on the screen when the stocktake has started
- The handheld is now ready to use for the stocktake.
Print off the sheets of the products to be counted in the stocktake
- Press Print Stocktake sheets – this will give you all the Negative products available for you to

- Check what has been scanned so far on the stocktake
- Open Rx365 back office
- Select Stocktakes
- Click on 'Show products counted so far'.
- Products that have an incorrect count on them
- Open Rx 365 Back office.
- Select Stocktakes
- Click on View stock Variances - this will show all the products available in the stocktake.
- Click on the options button located on the top right of the screen.
- Click on show variances only - this will show you only the products you have counted so far where there is a difference between your expected stock level and your actual count.

- Add a product to the stocktake from the Back Office
- Sign in the Rx 365 Back Office
- Select stocktake
- Scan in the barcode or type in the description of the product(s) that you want to add
- Type in the quantity of the product being added and select enter.

Complete a Stock Take
- Sign into Rx 365 Back office.
- Select Stocktake and click on 'Click here to end this stocktake'.

- Press 'Yes I'm done counting' - this will complete the stocktake.
- You will now get a summary of the stocktake.

- This will show all the products counted.
- Stock variances after the stocktake is completed
- Click on the stock variance button located on the top right-hand side of the screen.
- This will show you all the products that were counted so far where there is a variance
- Products that need to be re-counted
- If the product is sold and counted in the sane minute then the screen will flag these products to you that you may need to re-count them.
Cancel Stocktake
If you find that a Stock Take was started incorrectly and you wish to cancel it, you can do this from the Stock Takes module.
N.B. Please note that if you have already counted some products, these changes will NOT be reversed by cancelling the Stock Take. If you wish to revert the values applied in the Stock Take, you will need to do this against the product(s) individually.
To cancel a Stock Take that is currently running:
- Navigate to the Stock Takes module
- Since there is already a Stock Take running you will see the following screen:
-
Press Cancel Stock Take

-
If the current Stock Take was setup as a Zeroising Stock Take you will be asked to confirm that you wish to cancel the Stock Take:
